When should hops be added to beer?
It sounds like a simple question, but hop timing is one of the most powerful tools a brewer has for controlling bitterness, flavor and aroma.
The same hop added at the beginning of the boil can produce a very different result from the same hop added five minutes before flameout.
Move that addition to flameout or a lower-temperature whirlpool, and the character changes again.
A typical recipe may contain instructions such as:
60 minutes
30 minutes
15 minutes
10 minutes
5 minutes
Flameout
Whirlpool at 80°C
These numbers are not arbitrary.
They describe how long — and under what conditions — the hops interact with hot wort.
During that time, heat changes both the bittering compounds and the volatile aromatic compounds in the hops.
Understanding this relationship allows you to stop thinking of hop additions as fixed recipe instructions and start using them as tools.
The basic principle is simple:
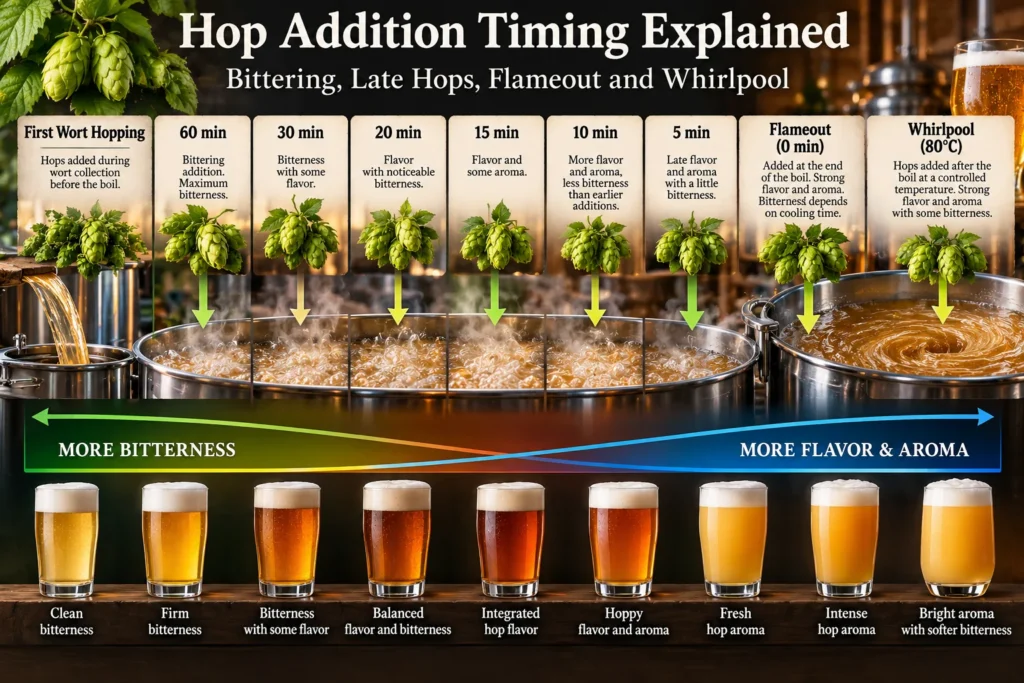
The earlier hops are added, the more their contribution tends to move toward bitterness. The later and cooler they are added, the more their flavor and aroma can be preserved.
But the reality is more interesting than simply “early = bitter” and “late = aroma.”
Let us look at what actually happens.
Why Hop Timing Matters
Hops contribute several different things to beer.
For this article, the two most important are:
bittering compounds
and
volatile aromatic compounds.
Heat affects these differently.
Alpha acids from hops are not initially very soluble in wort. During boiling, heat converts them into more soluble iso-alpha acids through a process called isomerization.
These iso-alpha acids are responsible for much of the familiar bitterness in beer.
At the same time, hops contain volatile oils responsible for many of their characteristic aromas.
These compounds can contribute impressions such as:
- citrus
- pine
- floral
- herbal
- spicy
- tropical fruit
- stone fruit
- resin
- fruit
The problem is that many aromatic compounds are volatile.
Long exposure to boiling wort drives much of them away.
This creates the fundamental relationship behind hop timing:
Longer hot exposure → more bittering potential, less fresh hop aroma
Shorter hot exposure → less bitterness, more flavor and aroma
Lower-temperature exposure → even greater aroma retention, with reduced but not necessarily zero bitterness
This principle explains most traditional hop schedules.
The Traditional 60-Minute Hop Addition
A hop addition made approximately 60 minutes before the end of the boil is traditionally called a bittering addition.
For example:
20 g Magnum — 60 min
means the hops remain in boiling wort for approximately one hour.
During this period, alpha acids have substantial time to isomerize.
As a result, the brewer extracts bitterness efficiently.
At the same time, much of the hop’s volatile aroma is lost during the long boil.
This is why brewers often choose relatively clean, high-alpha hops for bittering.
The objective is not necessarily to obtain the most interesting aroma from that hop.
The objective is often:
efficient, predictable bitterness.
A 60-minute addition therefore contributes primarily to the beer’s bitterness rather than its fresh hop aroma.
Does a 60-Minute Addition Contribute No Flavor?
This is an important simplification to avoid.
A 60-minute addition does not become completely invisible except for bitterness.
Hop compounds interact with wort in complex ways, and some character can remain.
But compared with later additions, the distinctive fresh aroma of the variety is greatly reduced.
For practical recipe design, it is useful to think of a 60-minute addition as:
primarily a bitterness addition.
That is different from saying:
it contributes only bitterness.
Why 60 Minutes?
Sixty minutes became a common reference point because it provides good bittering utilization within a normal wort boil.
But hops do not suddenly begin working at exactly 60 minutes.
A 45-minute addition can provide substantial bitterness.
A 75- or 90-minute boil can extract more, although the increase becomes progressively less dramatic.
The relationship is not linear.
You do not get twice as much bitterness simply by boiling hops twice as long.
Hop utilization rises with boiling time, but the gains gradually diminish.
For most modern homebrew recipes, a 60-minute bittering addition is a practical and familiar standard.
30-Minute Hop Additions
A 30-minute addition sits somewhere between traditional bittering and late hopping.
At this point, the hops still have enough time in boiling wort to contribute significant bitterness.
However, somewhat more flavor character may remain compared with a 60-minute addition.
Historically, schedules with additions at:
60 + 30 + 15 + 5 minutes
were common.
Today, many brewers simplify their schedules because a 30-minute addition can occupy an awkward middle ground:
it is less efficient for pure bittering than an earlier addition and preserves less aroma than a later addition.
That does not make it useless.
It simply means you should know why it is there.
If you want bitterness with some integrated hop flavor, it can make sense.
If your only objective is clean bitterness, an earlier addition may be more efficient.
If your objective is bright aroma, a later addition may be more effective.
20-Minute Hop Additions
At around 20 minutes before flameout, we begin moving more clearly into what brewers traditionally called flavor additions.
The hops still contribute meaningful bitterness.
But more of their varietal character can survive compared with a long bittering addition.
A 20-minute addition can produce a more integrated hop flavor rather than an intensely fresh aroma.
This can work particularly well in beers where you want the hops to feel like part of the overall flavor rather than sitting prominently above the beer.
Examples might include:
- Pale Ale
- Bitter
- traditional IPA
- Amber Ale
- certain lagers
- Belgian ales
The distinction between “bittering,” “flavor” and “aroma” additions is not absolute.
It is a continuum.
A 20-minute addition contributes some bitterness, some flavor and some aroma.
The proportions simply shift as the timing changes.
15-Minute Hop Additions
Fifteen minutes before the end of the boil is a very common late-boil addition.
At this stage, hops can still add noticeable bitterness, especially when using high-alpha varieties.
But substantially more hop character can remain compared with a 60-minute addition.
A 15-minute addition is therefore useful when you want:
bitterness + hop flavor + some aroma
from the same addition.
In moderately hopped beers, a 15-minute addition can contribute a significant part of the overall hop character.
This is also why ignoring late-boil additions in bitterness calculations can be a mistake.
Fifteen minutes in boiling wort is still enough time to produce real bitterness.
10-Minute Hop Additions
At 10 minutes, the balance shifts further toward flavor and aroma.
The hop is still exposed to boiling wort, so alpha acids continue to isomerize.
Therefore:
a 10-minute addition is not bitterness-free.
But compared with earlier additions, more volatile compounds survive.
This makes 10-minute additions useful for building a clear hop flavor while still adding some bitterness.
In Pale Ale and IPA recipes, this can create a bridge between the clean bitterness from an early addition and the fresher character of flameout or whirlpool hops.
For example, a schedule might look like:
Magnum — 60 min
Centennial — 10 min
Citra — flameout
Each addition has a different role.
The Magnum provides the bitter foundation.
Centennial contributes more recognizable hop flavor.
Citra provides fresher late-hop aroma.
The important lesson is that timing can separate the functions of different additions.
5-Minute Hop Additions
A five-minute addition is firmly in late-hop territory.
Only a short period remains before the heat source is turned off.
This means less bittering utilization than at 10, 15 or 60 minutes, while more volatile aroma can remain.
A five-minute addition can provide:
fresh hop flavor
noticeable aroma
some bitterness
It is particularly useful when the brewer wants a late-hop character but still wants the hops exposed briefly to boiling wort.
Before whirlpool hopping became widespread among homebrewers, five-minute and flameout additions were among the most common ways to create strong hop aroma.
They remain useful today.
What Happens at Flameout?
Flameout means the heat source is turned off at the end of the boil.
A recipe might say:
Citra 40 g — flameout
or:
Cascade 30 g — 0 min
Both usually mean the hops are added when the boil ends.
But there is an important detail:
the wort is still extremely hot.
Turning off the heat does not instantly cool the wort.
If the wort remains close to boiling temperature for several minutes, chemical reactions continue.
Alpha acids can still isomerize.
Aromatic compounds can still volatilize.
Therefore, a “0-minute” addition does not automatically mean:
zero bitterness.
Its actual contribution depends heavily on what happens after flameout.
Flameout Is a Moment — Hop Stand Is a Process
This distinction is useful.
Flameout describes the moment when heating stops.
A hop stand describes leaving hops in hot wort for a period after the boil.
For example:
- Turn off the heat.
- Add 50 g of hops.
- Leave them in the hot wort for 20 minutes.
- Begin chilling.
That is effectively a hot hop stand.
If the wort remains very hot during those 20 minutes, the hops can contribute meaningful bitterness as well as flavor and aroma.
This is why two brewers using the same “0-minute” hop addition can obtain different results.
One brewer may begin rapid chilling immediately.
Another may leave the wort near 95°C for 20 minutes.
Those are not equivalent hop treatments.
What Is a Whirlpool Addition?
In brewing, a whirlpool addition generally refers to hops added after the boil, while the wort is still hot but often after it has cooled to a chosen temperature.
The wort may be circulated or stirred to create a whirlpool, but in homebrewing the term is also commonly used for a controlled hot hop stand even when there is no powerful commercial-style whirlpool.
A typical instruction might be:
Citra 50 g — whirlpool at 80°C for 20 minutes
This gives us two important variables:
temperature
and
time.
These variables allow the brewer to control the balance between bitterness and aroma much more precisely than a simple “0-minute” instruction.
Why Whirlpool Temperature Matters
Temperature has a major effect on what happens to hops.
At temperatures close to boiling, alpha-acid isomerization continues relatively efficiently and volatile aromatic compounds are lost more rapidly.
As the wort cools, isomerization slows and more aromatic compounds can be retained.
This creates a practical spectrum.
Very Hot Whirlpool — Approximately 90–100°C
Expect:
- more bitterness
- greater loss of highly volatile aroma compounds
- strong hop flavor
- less aroma preservation than at lower temperatures
This can be useful when the brewer wants late-hop character together with meaningful bitterness.
Moderate Whirlpool — Approximately 80–90°C
This is a very popular range.
It can provide:
- strong hop flavor
- good aroma retention
- some additional bitterness
- a useful balance between extraction and preservation
Many homebrewers choose around 80°C because it provides an effective compromise.
Lower Whirlpool — Approximately 70–80°C
At these temperatures, bitterness formation is reduced further while aroma preservation becomes increasingly important.
This can be useful for beers where the brewer wants a softer hop profile and strong aromatic expression.
The exact result still depends on time, hop quantity, wort composition and cooling behavior.
Is 80°C a Magic Temperature?
No.
There is no universal temperature at which bitterness suddenly stops and aroma suddenly begins.
The chemistry changes gradually.
An 80°C whirlpool is popular because it is practical and offers a useful balance.
But:
75°C can work.
85°C can work.
90°C can work.
The correct temperature depends on the beer you are trying to make.
A West Coast IPA may benefit from a different approach than a soft Hazy IPA.
A Pale Ale may require much less whirlpool hopping than either.
Treat temperature as a recipe-design variable, not a rule.
Whirlpool Time Matters Too
Temperature is only half of the equation.
The other major variable is:
contact time.
Common hop stand or whirlpool times include:
10 minutes
15 minutes
20 minutes
30 minutes
Longer contact allows more compounds to move from the hops into the wort.
But longer is not automatically better.
At high temperatures, longer contact can increase bitterness and continue driving off volatile compounds.
At lower temperatures, longer contact can help extraction while preserving more aroma.
A practical homebrew whirlpool might therefore be:
cool wort to 80°C → add hops → hold for 20 minutes → continue chilling.
This creates a much more controlled process than simply adding hops at flameout and waiting an undefined amount of time.
80°C for 20 Minutes: Why Is It So Common?
This combination is popular because it sits in a useful middle ground.
At around 80°C:
- extraction remains effective;
- aromatic compounds are better preserved than near boiling;
- some bitterness may still be produced;
- hop flavor can be strong;
- the process is easy to reproduce at home.
It is not the only correct method.
But it is a very practical starting point for Pale Ale, IPA and other hop-forward beers.
Once you know what it produces in your system, you can adjust.
Want more bitterness and cooked hop character?
Try hotter.
Want softer bitterness and greater aroma emphasis?
Try cooler.
The important thing is consistency.
The Importance of Cooling Speed
Cooling speed changes late-hop behavior.
Imagine two brewers.
Both add hops at flameout.
Brewer A immediately begins chilling and reaches 80°C within two minutes.
Brewer B waits 15 minutes before chilling.
Their recipes may both say:
50 g Citra — flameout
but the hops experienced very different thermal conditions.
Brewer B’s hops spent much longer near boiling temperature.
That can mean:
- more isomerization;
- more bitterness;
- greater loss of volatile compounds;
- a different flavor profile.
This is why late-hop recipes become more reproducible when they specify both:
temperature + time.
“Whirlpool 80°C for 20 minutes” tells us far more than simply “0 min.”
The Whirlpool Continues to Add Bitterness
One of the most common misconceptions is:
“Only boil additions contribute IBU.”
That is not correct.
Very hot post-boil additions can still contribute bitterness.
The amount depends on several variables, including:
- temperature;
- contact time;
- alpha-acid percentage;
- hop quantity;
- wort gravity;
- cooling speed;
- brewing system.
This becomes especially important in heavily whirlpool-hopped beers.
Adding 200 g of high-alpha hops to very hot wort and holding them there for a long time cannot automatically be treated as zero bitterness.
The sensory bitterness may also behave differently from what a simple recipe calculator predicts.
Why IBU Calculators Can Struggle With Whirlpool Hops
Traditional IBU equations were designed primarily around boiling additions.
Whirlpool and hop-stand additions are more difficult to model accurately because the wort temperature changes during the process and every brewing system cools differently.
Some brewing software estimates whirlpool utilization.
These estimates are useful.
But they are still estimates.
For consistent brewing, your own system becomes important.
If your calculated 40 IBU Pale Ale consistently tastes much more bitter after a large 95°C hop stand, you have learned something about your process.
Recipe calculations are tools.
Your beer is the final measurement.
A Practical Hop-Timing Spectrum
A useful way to visualize the process is:
| Addition | Main Contribution | Aroma Retention | Bittering Potential |
|---|---|---|---|
| 60 min | Bitterness | Low | High |
| 30 min | Bitterness + flavor | Low–Moderate | Medium–High |
| 20 min | Flavor + bitterness | Moderate | Medium |
| 15 min | Flavor + some aroma | Moderate | Medium |
| 10 min | Flavor + aroma | Moderate–High | Low–Medium |
| 5 min | Aroma + flavor | High | Low |
| Flameout | Aroma + flavor | High | Variable |
| Hot whirlpool | Flavor + aroma + some bitterness | High | Variable |
| Cooler whirlpool | Aroma-focused | Higher | Lower |
This is intentionally a general guide.
The real contribution depends on the hops and brewing process.
Early Hops vs Late Hops
It can be useful to think of the hop schedule as layers.
Early Addition
Creates the bitterness foundation.
Example:
Magnum — 60 minutes
Mid/Late-Boil Addition
Creates more recognizable hop flavor while still adding bitterness.
Example:
Centennial — 10 minutes
Flameout or Whirlpool
Creates fresher flavor and aroma.
Example:
Citra — 80°C whirlpool for 20 minutes
These layers can work together.
But not every beer needs all of them.
Do You Need a 60-Minute Addition?
Not always.
Some modern hop-forward beers obtain much of their bitterness from late-boil and whirlpool additions.
However, a traditional early bittering addition has several advantages:
- efficient bitterness;
- relatively predictable utilization;
- allows smaller quantities of expensive aroma hops;
- separates bitterness from aroma design.
For example, a brewer may use a small amount of Magnum at 60 minutes for clean bitterness and save expensive Citra or Nelson Sauvin for late additions.
This can be both technically effective and economical.
Do You Need 30, 20, 15, 10 and 5-Minute Additions?
Absolutely not.
A complicated hop schedule is not automatically better.
A recipe containing:
60 + 30 + 20 + 15 + 10 + 5 + flameout
may look sophisticated, but every addition should have a reason.
Modern recipes often simplify the schedule.
For example:
60 min bittering
10 min flavor
80°C whirlpool
can provide plenty of complexity.
Another beer may need only:
60 min
5 min
and nothing else.
Good recipe design is not about maximizing the number of additions.
It is about giving each addition a clear purpose.
What Is First Wort Hopping?
First Wort Hopping, usually abbreviated FWH, is a technique where hops are added to the kettle while wort is being collected from the mash, before the main boil begins.
The hops therefore remain in the wort as it heats toward boiling and then continue through the boil.
Historically, the technique is associated particularly with German brewing traditions.
FWH can contribute substantial bitterness.
Some brewers also describe the resulting bitterness as smoother or more integrated compared with a conventional early-boil addition.
However, sensory descriptions such as “smoother” should not be treated as universal guarantees.
The result depends on the recipe and brewing process.
For practical purposes, think of FWH as:
an early hop addition that contributes significantly to bitterness while exposing the hops to hot wort before boiling begins.
It is an interesting technique, but it is not required for excellent beer.
When Should You Use First Wort Hopping?
FWH can be useful in beers where you want:
- firm but integrated bitterness;
- traditional hopping techniques;
- a different alternative to a standard 60-minute addition.
It has been used successfully in:
- Pilsner;
- lager;
- Pale Ale;
- IPA;
- other hop-forward beers.
The best way to understand its effect is to compare it with your normal bittering method on your own brewing system.
Hop Timing and Beer Style
Different beer styles benefit from different timing strategies.
German Pils
A traditional schedule may emphasize early bitterness with smaller late additions.
The goal is often:
firm bitterness + elegant hop flavor + restrained aroma.
Czech Pilsner
Multiple kettle additions can build a layered traditional hop profile.
The hops are noticeable, but the character remains very different from a modern IPA.
English Bitter
Early and mid-to-late kettle additions can create bitterness and integrated hop flavor without requiring huge late-hop loads.
American Pale Ale
A practical schedule might include:
60 min + 10 min + flameout/whirlpool.
This creates a clean bitterness foundation with increasingly fresh hop character toward the end.
West Coast IPA
A West Coast IPA may use:
clean early bitterness + late-boil hops + hot-side whirlpool hops
to create firm bitterness, citrus, pine, resin and strong aroma.
Hazy IPA / NEIPA
Modern Hazy IPA often shifts a greater proportion of hops toward late-boil and whirlpool additions.
The objective is typically:
less harsh bitterness + intense hop flavor and aroma.
But whirlpool additions can still create substantial bitterness if they are large, hot and long.
Timing and Hop Quantity Work Together
Timing cannot be considered separately from quantity.
Consider:
10 g of hops at 10 minutes
versus
150 g at 10 minutes.
They are obviously not equivalent.
Likewise:
20 g at 80°C for 10 minutes
and
200 g at 80°C for 30 minutes
will behave very differently.
The brewer must consider:
time + temperature + quantity + alpha acids + beer style.
No single variable tells the entire story.
High-Alpha Hops in Late Additions
High-alpha hops are not restricted to bittering.
Modern aroma varieties can have relatively high alpha-acid levels and still be used heavily in late additions.
But remember:
if a high-alpha hop spends meaningful time in very hot wort, it can contribute more bitterness than expected.
This is especially relevant for:
- large 10-minute additions;
- flameout additions that remain near boiling;
- hot whirlpools;
- long hop stands.
A recipe may appear to contain only a small formal “bittering addition,” while the hot-side late hops contribute much more bitterness.
Aroma Is Not Simply “Saved” by Adding Hops Later
Late hopping is often explained as:
“Add hops late so the aroma does not boil away.”
That is broadly useful, but incomplete.
Hot-side hop chemistry is complicated.
Different aromatic compounds have different volatility and solubility.
Some are lost quickly.
Some survive better.
Some can be transformed.
Some interact with wort compounds.
Therefore, late hopping does not simply preserve the exact smell of raw hop pellets inside the finished beer.
Instead, it creates a different aromatic expression.
This is one reason why:
kettle hop aroma
whirlpool hop aroma
and
dry-hop aroma
are not identical.
The dry-hop side deserves its own article.
Whirlpool vs Dry Hop
These techniques are sometimes treated as if they perform the same job.
They do not.
Whirlpool hops are exposed to hot wort.
Dry hops are added on the cold side, usually during or after fermentation.
The chemical environment is different.
A whirlpool can contribute:
- hop flavor;
- aroma;
- some bitterness.
Dry hopping is primarily used to build fresh hop aroma and flavor without conventional kettle isomerization.
Because dry hopping has its own variables — timing, temperature, contact time, oxygen exposure and fermentation interaction — it deserves to be treated separately.
For now, remember:
Whirlpool hopping is not simply “hot dry hopping.”
It is its own brewing technique.
Should You Stir or Recirculate During a Whirlpool?
Movement can improve contact between wort and hops.
Commercial breweries often create a strong whirlpool partly to collect solids in the center of the vessel.
Homebrewers may use:
- pump recirculation;
- gentle stirring;
- periodic mixing;
- a simple hop stand with minimal movement.
All can work.
The important goals are:
- good wort–hop contact;
- controlled temperature;
- controlled contact time;
- repeatability.
You do not need industrial whirlpool equipment to use whirlpool hopping effectively.
Hop Spiders and Whirlpool Extraction
Many homebrewers use a hop spider or hop basket to keep hop material contained.
This makes transfer easier and can reduce hop debris.
However, packing a very large quantity of hops tightly into a small basket can restrict wort movement.
Poor circulation may reduce extraction.
If using a hop spider:
- give the hops enough space;
- maintain good wort contact;
- avoid compressing a large hop charge into a tiny volume;
- gently move or circulate wort when appropriate.
The goal is not simply to put the hops into the kettle.
The wort must be able to interact with them.
A Simple Pale Ale Hop Schedule
Imagine a 25-liter American Pale Ale.
You want:
- clean bitterness;
- citrus hop flavor;
- fresh late-hop aroma.
A simple schedule might be:
Magnum — 60 min
for clean bitterness.
Cascade + Centennial — 10 min
for citrus and classic American hop flavor.
Cascade + Centennial — 80°C whirlpool, 20 min
for fresher aroma and flavor.
Notice how every stage has a purpose.
There is no need for seven separate additions.
A Simple West Coast IPA Schedule
For a West Coast IPA, you might build:
60 min — clean bittering hop
10 min — Centennial / Chinook
5 min — Citra / Centennial
80–85°C whirlpool — Citra / Simcoe / Centennial
The early addition builds bitterness.
The 10- and 5-minute additions add citrus, pine, resin and hop flavor.
The whirlpool adds fresher aromatic layers.
The exact hops are less important here than understanding the structure.
A Simple Lager Schedule
A lager does not necessarily require complicated hopping.
For example:
60 min — bittering addition
10 min — Noble hop
flameout — small Noble hop addition
This can create:
clean bitterness + elegant flavor + restrained aroma.
A huge whirlpool addition would create a very different beer.
That may be desirable in a modern hoppy lager, but it would be a deliberate stylistic choice.
Common Hop-Timing Mistakes
1. Assuming Flameout Means Zero Bitterness
The wort is still hot.
Isomerization does not stop instantly.
2. Ignoring Whirlpool Temperature
“20-minute whirlpool” is incomplete information.
Was it at:
98°C?
90°C?
80°C?
70°C?
Those can produce different results.
3. Ignoring Cooling Time
Slow chilling extends hot contact and can increase late-hop bitterness.
4. Using Every Possible Addition Time
More additions do not automatically create better beer.
Each addition should have a purpose.
5. Treating All Late Additions as Aroma Only
A 15-minute addition can contribute substantial bitterness.
So can a large hot whirlpool.
6. Assuming Longer Whirlpool Is Always Better
Longer extraction can also mean more bitterness and more loss of volatile compounds, especially at high temperature.
7. Copying a Recipe Without Considering the Brewing System
A brewer with rapid chilling may get a different result from someone whose wort remains above 90°C for 20 minutes.
Your equipment matters.
How to Design Your Own Hop Schedule
Start by defining the finished beer.
Ask:
How bitter should it be?
How much hop flavor do I want?
How much hot-side hop aroma do I want?
Then assign jobs to the additions.
Step 1 — Build the Bittering Foundation
If the beer needs firm bitterness, choose an efficient early addition.
Step 2 — Decide Whether You Need Kettle Hop Flavor
If yes, consider a 20-, 15-, 10- or 5-minute addition depending on the intensity and bitterness you want.
Step 3 — Decide Whether You Need Flameout or Whirlpool Character
For stronger late-hop aroma and flavor, add a flameout or controlled whirlpool addition.
Step 4 — Define Temperature
Do not write only:
“whirlpool.”
Write:
“80°C whirlpool.”
Step 5 — Define Time
For example:
80°C for 20 minutes.
Now the process is reproducible.
Step 6 — Record the Result
After tasting the finished beer, ask:
- Was bitterness too high?
- Too low?
- Was the hop flavor strong enough?
- Did the aroma survive?
- Was the whirlpool too hot?
- Was the contact too long?
Then adjust the next batch.
That is how a hop schedule becomes part of your brewing system rather than something copied blindly from another recipe.
A Practical Hop Timing Reference
| Timing | Typical Purpose |
|---|---|
| First Wort Hop | Early bitterness, integrated hot-side hop character |
| 60 min | Efficient bitterness |
| 30 min | Bitterness + some flavor |
| 20 min | Bitterness + flavor |
| 15 min | Flavor + bitterness + some aroma |
| 10 min | Flavor + aroma + some bitterness |
| 5 min | Late flavor + aroma |
| Flameout / 0 min | Strong late-hop flavor and aroma; bitterness depends on cooling |
| 90–100°C hop stand | Strong extraction, significant potential bitterness |
| 80–90°C whirlpool | Strong flavor/aroma with some bitterness |
| 70–80°C whirlpool | Greater aroma emphasis, reduced bitterness |
Again, these are useful brewing categories, not rigid chemical boundaries.
Temperature, Time and Purpose
If there is one concept to remember from this article, it is this:
Hop timing is really the interaction of temperature, time and purpose.
A recipe that says:
“50 g hops at flameout”
is less informative than:
“Cool to 80°C, add 50 g hops, hold for 20 minutes, then continue chilling.”
The second instruction defines the process.
And defined processes are easier to reproduce.
This is especially important when developing your own recipes.
Learn Your Own Brewing System
Two brewers can follow the same hop recipe and obtain different results.
Their:
- kettles;
- batch sizes;
- cooling systems;
- hop spiders;
- pumps;
- whirlpool methods;
- cooling rates
may all differ.
This is why brewing records are so valuable.
Record:
hop variety
amount
alpha acid percentage
addition time
whirlpool temperature
whirlpool duration
cooling time
and later:
your sensory impression.
After several batches, you begin to understand how hop timing behaves on your system.
That knowledge is often more useful than copying another brewer’s schedule exactly.
Final Thoughts
Hop timing is one of the most important tools in recipe design.
An early addition can create the bitter foundation of a beer.
Move the hops later and more flavor survives.
Move them to flameout and the balance shifts further toward aroma.
Cool the wort before adding them and you gain another level of control.
The brewer is therefore not simply deciding:
which hop to use.
The brewer is also deciding:
when that hop should meet the wort, at what temperature, and for how long.
A simple schedule can be extremely effective when every addition has a purpose.
You do not need hops at 60, 30, 20, 15, 10, 5 minutes and flameout simply because those options exist.
Instead, build the schedule around the beer.
Use early hops when you need efficient bitterness.
Use late-boil hops when you want integrated hop flavor.
Use flameout and whirlpool additions when you want to preserve more aromatic character.
And define whirlpool additions by temperature and time, not simply by the word “whirlpool.”
Do not add hops at a certain time simply because a recipe tells you to. Understand what that timing does, then place each hop where it can create the character your beer needs.
That is when hop timing becomes recipe design.