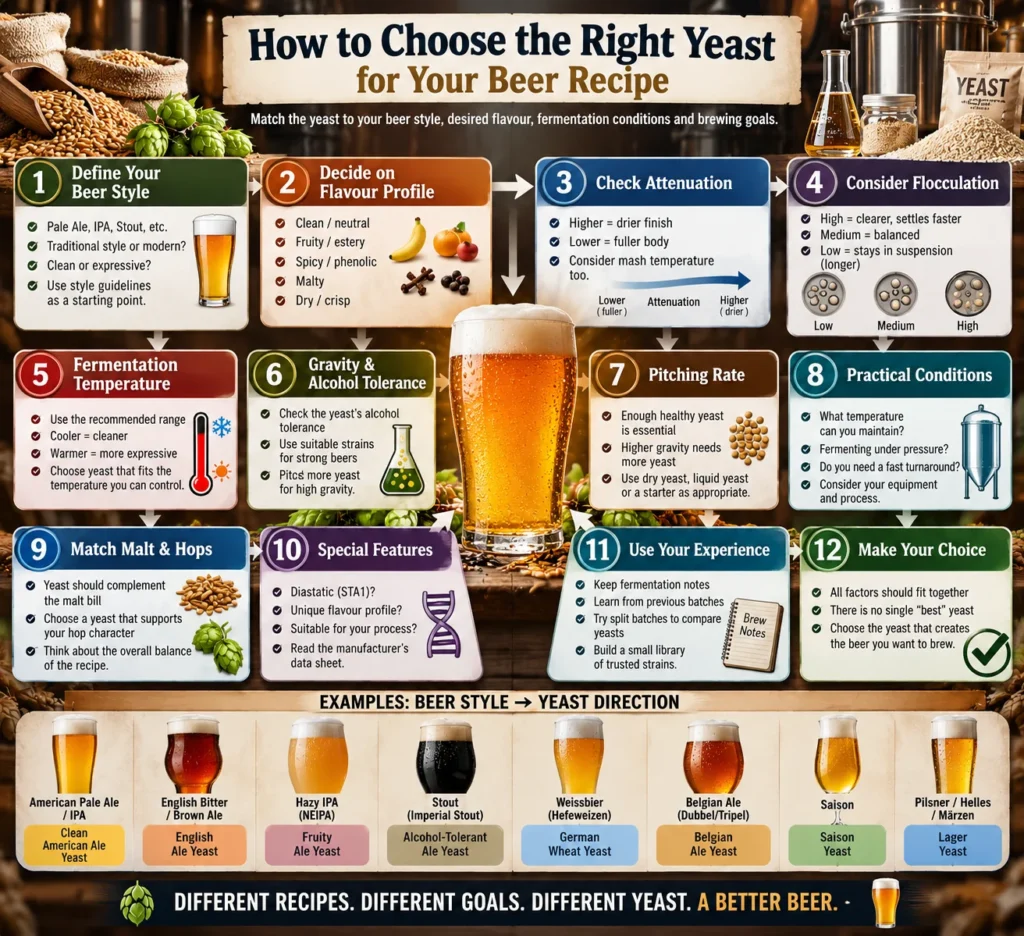
Choosing yeast is one of the most important decisions in beer recipe design.
Homebrewers often spend a great deal of time selecting malt, calculating bitterness, building hop combinations and adjusting brewing water, only to reach the yeast section of the recipe and choose whatever packet happens to be available.
That can be a mistake.
Yeast does not simply determine whether wort becomes beer. It influences fermentation character, final gravity, dryness, body, aroma, flavour, clarity and even how the malt and hops are perceived in the finished beer.
Two beers brewed from exactly the same wort can taste remarkably different when fermented with different yeast strains.
The right question is therefore not:
“What is the best brewing yeast?”
A much better question is:
“What yeast will help create the beer I am trying to make?”
In this final article of our yeast series, we will bring everything together: beer style, flavour profile, attenuation, flocculation, fermentation temperature, pitching rate, alcohol tolerance, dry and liquid yeast, pressure fermentation and practical brewing conditions.
The goal is not simply to choose a yeast that will ferment.
The goal is to choose a yeast that fits the entire recipe.
Start With the Finished Beer, Not the Yeast Packet
Before choosing yeast, imagine the beer you want in the glass.
Do you want it to be clean and crisp?
Fruity and soft?
Malty and slightly sweet?
Very dry?
Peppery and complex?
Banana and clove driven?
Hop-forward with almost no obvious yeast character?
Clean, smooth and lager-like?
This question immediately narrows the yeast choices.
For example, imagine that you are designing an American Pale Ale with Cascade, Centennial and Citra.
You probably want the citrus and hop character to remain prominent.
A clean American ale strain makes sense.
Now imagine an English Brown Ale built around Maris Otter, Crystal Malt and traditional English hops.
A slightly fruity English yeast may contribute an important part of the finished character.
For a German Weissbier, a completely neutral yeast would remove much of what defines the style.
For a Belgian Tripel or Saison, fermentation character may be one of the most important elements of the entire recipe.
Choose the finished beer first. Then choose the yeast capable of creating it.
Step 1: Identify the Beer Style
Beer style is not an absolute rule, but it is an excellent starting point.
Traditional beer styles evolved alongside particular fermentation cultures, ingredients and brewing methods.
A few broad examples:
| Beer Style | Typical Yeast Direction |
|---|---|
| American Pale Ale | Clean American ale |
| West Coast IPA | Clean, attenuative American ale |
| Hazy IPA / NEIPA | Fruity, moderately expressive ale |
| English Bitter | English ale |
| Brown Ale | English or suitable American ale depending on style |
| Irish Stout | Irish/English-type ale strain |
| Imperial Stout | Alcohol-tolerant ale strain with suitable attenuation |
| Weissbier / Hefeweizen | German wheat yeast |
| Belgian Dubbel | Belgian ale |
| Belgian Tripel | Highly attenuative Belgian ale |
| Saison | Saison strain |
| Kölsch | Kölsch-type ale strain |
| Altbier | Altbier/German ale strain |
| Pilsner | Lager yeast |
| Helles | Lager yeast |
| Vienna Lager | Lager yeast |
| Märzen | Lager yeast |
| Bock | Lager yeast suitable for stronger wort |
These are starting points rather than rigid laws.
Modern brewing deliberately crosses traditional boundaries all the time.
You can ferment a hop-forward beer with lager yeast. You can use an English-derived strain in a modern Hazy IPA. You can produce a clean beer with certain ale strains at relatively cool temperatures.
But if you understand the traditional choice first, you can make deviations deliberately rather than accidentally.
Step 2: Decide How Much Yeast Character You Want
One of the most useful questions when choosing yeast is:
Should the yeast be in the foreground or in the background?
Some beers benefit from very little obvious fermentation character.
Others depend on it.
We can imagine yeast character on a broad spectrum:
Very Clean → Clean → Lightly Fruity → Fruity → Fruity & Spicy → Highly Expressive
A West Coast IPA will often sit toward the clean side.
An English Bitter may sit somewhere in the middle.
A Belgian ale can move strongly toward the expressive side.
A German Hefeweizen may be immediately recognizable because of its yeast character.
A Saison can be dry, fruity, peppery and highly fermentation-driven.
This distinction is extremely useful because it prevents us from choosing yeast purely according to attenuation or temperature range.
Two strains may both attenuate to approximately 78%, yet create completely different beers.
Step 3: Understand the Yeast’s Flavour Profile
Before choosing a strain, read how the manufacturer describes its fermentation character.
Look for terms such as:
Clean / Neutral
Useful when you want malt and hops to dominate.
Fruity / Estery
May produce pear, apple, stone fruit, red fruit, citrus, tropical fruit or banana-like impressions depending on the strain.
Phenolic / Spicy
Can produce clove, pepper, spice or other distinctive fermentation notes.
Malty
Some strains are described as supporting or emphasizing malt character.
Dry / Crisp
Often associated with good attenuation and restrained residual sweetness, although the actual final gravity also depends strongly on wort fermentability.
Do not interpret these descriptions in isolation.
“Fruity” does not mean that every fruity strain tastes the same.
An English strain producing subtle stone-fruit esters is very different from a German wheat strain producing strong banana character.
Likewise, “spicy” Belgian and Saison strains can differ dramatically.
The manufacturer’s description is a starting point for understanding the strain’s personality.
Step 4: Check Attenuation
Attenuation describes how much of the fermentable extract in the wort the yeast appears to consume.
It has a major influence on final gravity and therefore on how dry, full or sweet the beer may feel.
As discussed earlier in this series, apparent attenuation can be calculated as:
Apparent Attenuation (%) = (OG − FG) ÷ (OG − 1) × 100
For example:
OG: 1.050
FG: 1.010
Apparent attenuation:
(1.050 − 1.010) ÷ (1.050 − 1.000) × 100 = 80%
A higher-attenuating strain will generally produce a lower final gravity than a lower-attenuating strain when other conditions are similar.
But attenuation specifications are not a guarantee of exact final gravity.
The wort matters too.
Yeast Attenuation and Mash Temperature Work Together
Imagine two beers using exactly the same yeast.
One is mashed relatively low and produces a highly fermentable wort.
The other is mashed warmer and contains a larger proportion of less-fermentable carbohydrates.
They may finish at different gravities despite using the same yeast.
Likewise, two different yeast strains may produce different final gravities from the same wort because they differ in their ability to use particular sugars.
This means that attenuation should never be considered separately from recipe design.
If you want a dry West Coast IPA, you might combine a reasonably fermentable wort with a well-attenuating yeast.
If you want a fuller English Brown Ale, you may deliberately choose a different balance of mash profile, malt composition and yeast attenuation.
The goal is not always the lowest possible FG.
The goal is the appropriate FG for the beer.
Step 5: Check Flocculation
Flocculation describes the tendency of yeast cells to bind together and settle out of the beer.
Manufacturers often describe strains as having:
Low, Medium or High Flocculation.
A highly flocculent yeast may settle quickly and form a compact yeast cake.
Potential advantages include faster clarification, easier transfers and clearer beer.
But very high flocculation can sometimes cause a strain to settle before fermentation has fully completed, especially if other conditions are poor.
Low-flocculation strains may remain suspended longer.
This can mean slower clarification, but it may also be completely appropriate for the beer.
For example, brilliant clarity is important in some styles but largely irrelevant in others.
A Hefeweizen is not supposed to look like a filtered Pilsner.
A Hazy IPA does not need the same visual clarity as a Kölsch.
Choose flocculation according to the beer and your process rather than assuming that high flocculation is always better.
Step 6: Check the Recommended Fermentation Temperature
Every yeast strain has a useful fermentation temperature range.
This is one of the most important specifications on the package or technical data sheet.
For example, a manufacturer might recommend:
18–22°C
for a particular ale strain.
That does not mean the yeast will produce exactly the same beer at 18°C and 22°C.
Temperature affects yeast metabolism and therefore the production of fermentation compounds.
At the cooler end, a strain may produce a cleaner and more restrained profile.
At the warmer end, the same strain may become more expressive.
But this is strain-dependent.
Some Belgian and Saison strains are intentionally used warmer.
Traditional lager strains are generally fermented colder.
Certain modern lager strains can perform very well at warmer temperatures.
The important question is not:
“At what temperature can this yeast survive?”
It is:
“At what temperature will this yeast produce the character I want?”
Choose Yeast for the Temperature You Can Actually Control
This is especially important for homebrewers.
There is little benefit in choosing a strain that performs beautifully at 18°C if your fermentation environment will hold the beer at 25°C.
Likewise, choosing a traditional lager strain that ideally requires cold fermentation may create unnecessary difficulty if you have no reliable way to maintain those temperatures.
Your real brewing environment matters.
Suppose your fermentation area normally stays around 20–22°C.
You might choose an ale strain that performs well in that range.
If your room reaches 26–28°C in summer, you may need active temperature control, a more heat-tolerant strain or a different fermentation strategy.
A theoretically perfect yeast is not the perfect yeast if you cannot give it suitable conditions.
Remember: Beer Temperature Is Not Always Room Temperature
Active fermentation produces heat.
The temperature inside the fermenting beer can be higher than the surrounding air.
A room at 20°C does not necessarily mean the beer is fermenting at exactly 20°C.
During vigorous fermentation, the beer may become several degrees warmer depending on batch size, fermenter geometry and fermentation activity.
This matters most during the active phase, when many important flavour compounds are being produced.
Whenever possible, monitor the temperature of the beer rather than relying only on ambient room temperature.
Step 7: Consider Original Gravity and Alcohol Tolerance
Not every yeast is equally suitable for strong beer.
For a standard-strength Pale Ale around 1.045–1.055 OG, many common ale strains will have no difficulty completing fermentation.
But stronger beers create more demanding conditions.
Examples include Imperial Stout, Barleywine, Belgian Strong Ale, Doppelbock and other high-gravity beers.
As fermentation progresses, alcohol concentration rises and the environment becomes increasingly stressful for yeast.
Before choosing a strain for a strong beer, check its alcohol tolerance.
For example, if your planned beer could reach 11% ABV, choosing a strain with a stated tolerance around 8% would obviously be risky.
But alcohol tolerance alone is not enough.
You also need sufficient healthy yeast, suitable fermentation temperature, appropriate oxygenation at the beginning, adequate nutrition and a wort composition that the yeast can ferment effectively.
A yeast labelled as tolerant to 12% alcohol does not guarantee that every 12% beer will ferment successfully.
Step 8: Calculate an Appropriate Pitching Rate
The amount of yeast pitched matters.
Pitching too little healthy yeast can lead to a long lag phase, slow fermentation, incomplete attenuation, excessive fermentation character and inconsistent results.
Pitching more yeast is not automatically better either.
Different beers require different pitching rates.
High-gravity wort generally requires more yeast than low-gravity wort.
Traditional lager fermentation usually requires a larger healthy yeast population than a comparable ale fermentation.
Liquid yeast may require a starter depending on cell count, age and batch requirements.
Dry yeast often contains a large population of viable cells and can be extremely convenient.
As discussed in the previous article in this series, pitching rate should be considered according to batch volume, original gravity, yeast type and fermentation conditions.
Do not simply ask:
“Is one packet enough?”
Ask:
“Is this enough healthy yeast for this particular wort?”
Step 9: Dry Yeast or Liquid Yeast?
Both can produce excellent beer.
Modern dry yeast has improved enormously and is available in a wide range of specialized brewing strains.
Advantages of dry yeast can include long shelf life, easy storage, convenient pitching, high cell counts, excellent consistency and no need for a starter in many normal-strength batches.
Liquid yeast offers its own advantages, especially access to an enormous variety of specialized strains and cultures.
The decision should therefore not be based on the idea that:
liquid yeast = professional
and
dry yeast = beginner
That is outdated thinking.
Choose according to the strain you need, freshness, availability, batch size, required cell count, storage conditions and your preferred brewing process.
If the ideal strain for your beer is available dry, there is no inherent reason not to use it.
Step 10: Decide Whether You Need a Starter
A yeast starter is primarily a method of increasing healthy yeast biomass before pitching.
It is commonly associated with liquid yeast because a single package may not always provide enough viable cells for a particular batch, especially if the yeast is older or the wort is strong.
A starter may be useful when brewing a larger batch, using an older liquid yeast package, fermenting high-gravity wort or when the required pitching rate exceeds the available healthy cell count.
With many modern dry yeasts, making a starter is normally unnecessary and may even be counterproductive depending on the product and procedure.
Following the manufacturer’s instructions is generally the best approach.
The objective is not to perform extra steps simply because they seem more advanced.
The objective is to pitch an appropriate amount of healthy yeast.
Step 11: Consider Pressure Fermentation
If you ferment under pressure, yeast choice becomes even more important.
Pressure can influence yeast metabolism and may suppress the production or perception of certain fermentation compounds, particularly esters.
This can be useful for beers where a cleaner fermentation profile is desired.
Pressure fermentation is especially popular among homebrewers making lager-style beers at somewhat warmer temperatures.
It can also provide practical benefits such as closed transfers and natural carbonation through spunding.
But pressure is not automatically beneficial for every beer.
Imagine choosing a German wheat strain specifically because you want expressive banana and clove character.
Strong pressure from the beginning of fermentation may suppress part of the character you deliberately selected the yeast to create.
The same can apply to Belgian and Saison strains.
If yeast expression is central to the beer, excessive pressure may work against your goal.
Fermentation technique should support the yeast character you want, not automatically suppress it.
Step 12: Check Whether the Yeast Is Diastatic
This specification is particularly important for certain Saison and Belgian-type strains.
Some brewing yeasts are diastatic and may carry the STA1 gene associated with the ability to produce enzymes that allow fermentation of carbohydrates that ordinary brewing strains may leave behind.
This can result in extremely high attenuation and very low final gravity.
That can be perfect for Saison.
It can be disastrous if you expected a fuller beer.
Diastatic yeast also deserves special attention in cleaning and sanitation because unwanted carryover into another beer may cause continued fermentation, unexpected over-attenuation and potentially excessive carbonation after packaging.
If a manufacturer identifies a strain as diastatic, treat that information as an important part of the yeast specification.
Step 13: Consider the Malt Bill
Yeast does not work independently of malt.
The flavour contribution of the yeast should complement the malt bill.
For a recipe built around delicate Pale Malt and modern citrus-forward hops, a neutral yeast may provide the cleanest canvas.
For an English beer using Maris Otter, Crystal Malt and perhaps a little Chocolate Malt, a fruity English strain may complement the biscuit, caramel, nutty and toasted character.
For a Belgian Strong Ale, relatively simple malt and sugar additions can leave plenty of space for expressive fermentation character.
For a Weissbier, wheat malt provides texture, protein and grain character, while the yeast contributes much of the recognizable banana-and-clove profile.
Think of malt and yeast as partners.
Do not design them independently and hope they work together later.
Step 14: Consider the Hops
The same principle applies to hops.
If the beer contains large quantities of Citra, Mosaic, Nelson Sauvin, Amarillo, Cascade or other highly aromatic hops, ask whether the yeast should reinforce those aromas or stay out of their way.
A clean American strain can allow hop character to dominate.
A fruitier strain may complement tropical hop varieties in a Hazy IPA.
A strongly phenolic Belgian strain combined with aggressive modern hops could create an extremely complex beer — which may be intentional or may become chaotic.
Neither approach is automatically correct.
The important thing is that the yeast and hop profiles have a reason to exist together.
Step 15: Think About the Water Profile
Water chemistry and yeast selection may seem unrelated, but both influence how the finished beer is perceived.
A sulfate-forward water profile can emphasize dryness and hop bitterness.
A chloride-forward profile can increase the perception of fullness and softness.
Now combine this with yeast.
A highly attenuative clean strain plus sulfate-forward water can help create a very crisp, dry, hop-focused IPA.
A softer chloride-forward profile combined with a fruity ale strain can support the rounded mouthfeel of a Hazy IPA.
A malty lager may use a different water balance together with a clean lager strain.
Yeast is therefore one part of a larger system.
The best recipes are built by considering how the ingredients and process interact.
Step 16: Consider How Quickly You Need the Beer Ready
Fermentation speed should never be the only criterion for yeast selection, but practical brewing schedules do matter.
Some ale strains ferment rapidly and flocculate quickly.
Others need more time to reach stable gravity and condition properly.
Traditional lager fermentation and lagering can take significantly longer.
Some modern lager strains shorten this process.
Highly flocculent English strains may clear rapidly.
Low-flocculating strains may need additional conditioning or cold crashing.
If you need a beer ready for an event, consider the complete timeline:
Fermentation → Maturation → Stable Gravity → Cold Conditioning → Carbonation → Serving
Do not choose yeast purely because the manufacturer says fermentation can be completed in a certain number of days.
The beer is ready when the beer is ready.
Step 17: Think About Clarity
Not every beer needs to be crystal clear.
If you are brewing German Pils, Kölsch or another style where brilliant clarity is desirable, yeast flocculation and cold conditioning may be important considerations.
For Hefeweizen, yeast haze is part of the expected appearance.
For Hazy IPA, permanent or stable haze can be part of the intended character.
For Stout, absolute visual clarity is obviously far less noticeable.
Therefore, choosing a highly flocculent strain simply because you want “better yeast” makes little sense.
Clarity is a recipe goal, not a universal measure of fermentation quality.
Step 18: Read the Manufacturer’s Technical Data
Do not stop at the commercial name printed on the packet.
The technical data sheet may contain some of the most useful information available about the yeast.
Look for:
- recommended fermentation temperature
- apparent attenuation
- flocculation
- alcohol tolerance
- recommended beer styles
- flavour and aroma profile
- phenolic character
- diastatic status where relevant
- pitching recommendations
- storage requirements
- fermentation behaviour
Suppose two packets both say:
English Ale Yeast
One may attenuate moderately and flocculate extremely strongly.
Another may attenuate more deeply, remain in suspension longer and create a noticeably different ester profile.
The category name alone does not tell you enough.
Choose the strain, not just the label.
Step 19: Consider Your Own Brewing Experience With the Strain
Manufacturer data is extremely useful, but your own brewing records become even more valuable over time.
If you have used a strain several times, record:
Beer style
Original Gravity
Final Gravity
Pitching amount
Pitch temperature
Fermentation temperature
Maximum temperature reached
Time to stable gravity
Flocculation behaviour
Clarity
Flavour profile
Any unusual behaviour
After several batches, you may discover that a yeast performs slightly differently in your brewery than expected from a generic description.
Your equipment, wort composition, water, fermentation geometry, temperature control and process all influence the result.
This is how yeast selection becomes more precise over time.
You stop choosing yeast only from a catalogue.
You begin choosing it from experience.
Example 1: Choosing Yeast for a West Coast IPA
Imagine the target beer is:
OG: 1.060
Desired FG: approximately 1.008–1.012
Character: dry, crisp, strongly hop-forward
Hops: Citra, Centennial, Chinook
Fermentation: temperature controlled
What do we want from the yeast?
Clean fermentation.
Good attenuation.
Low-to-moderate ester production.
Reliable performance.
Enough flocculation for reasonable clarification.
The logical direction is a clean American ale strain.
An expressive Belgian strain might ferment the wort perfectly well, but the resulting beer would move away from the intended West Coast IPA character.
Example 2: Choosing Yeast for an English Brown Ale
Target:
OG: 1.045
Desired character: malty, rounded, lightly fruity
Malt: Maris Otter, Crystal, Chocolate Malt
Hops: traditional English varieties
Here we may want the yeast to participate in the flavour.
A suitable English strain with moderate attenuation and some ester production could add subtle fruit character while supporting the malt.
Very high attenuation might make the beer drier than intended.
A completely neutral strain could make the beer cleaner but potentially less traditionally expressive.
The correct choice depends on the exact Brown Ale you want.
Example 3: Choosing Yeast for a Hazy IPA
Target:
Character: soft, juicy, aromatic
Hops: Citra, Mosaic, Nelson Sauvin
Water: chloride-forward
Desired yeast role: complement the hop fruitiness
A completely neutral strain can make excellent IPA, but for this particular beer we may prefer a moderately expressive ale strain that contributes fruity esters and supports the overall juicy impression.
Attenuation should still be considered carefully.
Too much residual sweetness can make a heavily hopped beer tiring.
The goal is softness and fruit expression, not simply the highest possible final gravity.
Example 4: Choosing Yeast for an Imperial Stout
Target:
OG: 1.090 or higher
Character: rich, roasted, full but not cloying
Alcohol: potentially 9–11% or more
Here we need to consider much more than flavour.
The strain needs sufficient alcohol tolerance, reliable fermentation performance, suitable attenuation and an appropriate flavour profile.
Pitching rate becomes particularly important.
Healthy yeast becomes particularly important.
Fermentation temperature control becomes particularly important.
A yeast that performs beautifully in a 4% Bitter may not be the best choice for a 10% Imperial Stout.
Strong beers demand more from yeast.
Example 5: Choosing Yeast for Weissbier
Target:
Character: banana, clove, soft wheat, expressive fermentation
The yeast choice is obvious in principle:
a traditional German wheat beer strain.
But the specific strain still matters.
Some produce more banana.
Some emphasize clove.
Some create a more balanced profile.
Temperature, pitching rate and fermentation conditions can further influence the result.
Choosing a neutral American strain because it has the correct attenuation would completely miss the point of the recipe.
In this beer, fermentation character is not a side effect.
It is part of the style.
Example 6: Choosing Yeast for Saison
Target:
Character: dry, peppery, fruity, refreshing
Desired FG: very low
Fermentation: potentially warm
A Saison strain is the logical choice.
But we should still check whether it is diastatic, its expected attenuation, temperature range, flocculation, flavour description and fermentation behaviour.
One Saison strain may produce strong peppery phenolics.
Another may be more fruity.
Another may be extremely attenuative.
“Saison yeast” is still a family, not a single organism with one fixed behaviour.
Example 7: Choosing Yeast for Vienna Lager
Target:
Character: clean, smooth, malty, lightly toasted
Desired yeast role: support the malt without dominating it
A suitable lager strain makes sense.
We would check its temperature requirements, attenuation, sulfur behaviour, flocculation and suitability for malty lager styles.
The yeast should allow the Vienna and Munich malt character to remain clear while providing the clean fermentation profile expected from the style.
If fermentation temperature control is limited, a modern lager strain with greater temperature flexibility may be more practical than a traditional strain requiring very cold fermentation.
Again, the best yeast is the one that fits both the beer and your actual brewing conditions.
What If Two Yeasts Both Look Suitable?
This is where brewing becomes especially interesting.
Sometimes two strains genuinely are both good choices.
Suppose two American ale strains have similar attenuation, temperature ranges and alcohol tolerance.
One may be slightly cleaner.
The other may flocculate better.
Which should you choose?
Either could work.
At this point, small-batch split fermentation can be one of the best learning tools available.
Brew one wort.
Split it into two fermenters.
Pitch a different yeast into each.
Keep the conditions as similar as possible.
Then compare the beers side by side.
This teaches more about yeast character than reading dozens of descriptions.
The difference may be subtle.
Or it may be astonishing.
Do Not Choose Yeast Only by Final Gravity
A common mistake is looking at attenuation percentages and automatically choosing the highest.
For example:
Yeast A: 72–76% attenuation
Yeast B: 78–82% attenuation
Yeast B is not automatically better.
If you are brewing a dry IPA, it may be more suitable.
If you are brewing a malt-focused English ale, Yeast A may produce the balance you want.
If Yeast B has a flavour profile that conflicts with the recipe, its higher attenuation becomes irrelevant.
Numbers are useful.
But beer is not designed from numbers alone.
Do Not Choose Yeast Only by Fermentation Speed
Another common temptation is:
“This yeast finishes in three days, so it must be better.”
Fast fermentation can be convenient.
It is not automatically superior fermentation.
A strain that takes longer may produce exactly the flavour profile required by the style.
Furthermore, the end of visible fermentation does not necessarily mean the beer is ready to package.
Yeast may still be reducing unwanted fermentation compounds and the beer may still benefit from maturation.
Choose yeast for the beer, not simply for the fastest possible turnaround.
Do Not Choose Yeast Only by Brand
Brewers naturally develop favourite manufacturers.
There is nothing wrong with that.
But the logo on the packet should not determine the recipe.
Several manufacturers may offer excellent strains for the same brewing purpose.
The most important questions remain:
What does this strain taste like?
How does it attenuate?
How does it flocculate?
What temperature does it prefer?
Can it handle the gravity and alcohol level?
Does it fit my process?
Brand loyalty is less useful than strain knowledge.
Do Not Automatically Reuse the Same Yeast for Every Beer
Finding a reliable yeast is satisfying, and there is nothing wrong with using it frequently.
A familiar clean ale strain may become your house yeast for Pale Ale and IPA.
But using it in every beer simply because you know it works can limit recipe design.
A Stout may benefit from a different fermentation profile.
An English Brown Ale may become more interesting with an English strain.
A Weissbier fundamentally requires a different direction.
A Saison certainly does.
A lager does too.
Consistency is valuable.
So is choosing the correct tool.
Build a Small Personal Yeast Library
You do not need twenty yeast strains in your refrigerator.
For many homebrewers, a small number of well-understood strains can cover a surprisingly large range of beers.
For example:
One clean American ale strain
for Pale Ale, IPA, Blonde and other clean ales.
One English strain
for Bitter, Brown Ale, Porter and Stout.
One expressive Belgian strain
for Belgian-style ales.
One German wheat strain
for Weissbier and related styles.
One Saison strain
for dry farmhouse-style beers.
One reliable lager strain
for Pilsner, Helles, Vienna Lager and other lagers.
The exact number does not matter.
The important part is learning what each strain actually does in your brewery.
Five well-understood yeasts can be more useful than twenty strains you barely know.
A Practical Yeast Selection Checklist
Before buying or pitching yeast, ask yourself:
- What beer style am I making?
- Do I want clean or expressive fermentation character?
- What flavours should the yeast contribute?
- What attenuation do I need?
- What final gravity am I targeting?
- How fermentable is my wort likely to be?
- What flocculation level fits the beer?
- What fermentation temperature can I actually maintain?
- What is the wort’s original gravity?
- Does the yeast have sufficient alcohol tolerance?
- Am I pitching enough healthy cells?
- Do I need a starter?
- Am I fermenting under pressure?
- Is the strain diastatic?
- Does its flavour profile complement the malt?
- Does it complement the hops?
- How much conditioning time will the beer need?
- Have I used this strain before, and what did I learn from it?
If you can answer these questions, yeast selection becomes much easier.
The Yeast Specification Example
Imagine a manufacturer provides the following information:
Type: American Ale
Attenuation: 78–82%
Flocculation: Medium
Temperature: 18–22°C
Alcohol tolerance: 10%
Character: Clean, neutral, low ester production
Now imagine your recipe:
American Pale Ale
OG: 1.052
Target FG: 1.010
Fermentation temperature available: 19–20°C
Desired character: clean, hop-forward
ABV: approximately 5.5%
This yeast fits the recipe extremely well.
Now take the same yeast and consider a German Hefeweizen.
The technical performance may still be excellent.
It may ferment reliably.
It may reach the desired final gravity.
It may tolerate the alcohol.
But it is still the wrong choice if you want traditional banana-and-clove fermentation character.
This demonstrates an important principle:
Technical suitability and stylistic suitability are not always the same thing.
The best choice satisfies both.
Yeast Selection Is Recipe Design
When designing a recipe, do not write:
Malt → Hops → Water → Yeast
as though yeast is the final item to deal with.
Think instead:
Beer concept → Malt + Hops + Water + Yeast + Fermentation Process
All of these elements interact.
If you change the yeast, you may need to reconsider mash temperature.
If you change attenuation, you may reconsider bitterness.
If you choose a fruitier strain, you may reconsider hop varieties.
If you choose a very dry Saison strain, you may reconsider the malt bill.
If you choose a traditional lager strain, you must consider temperature control and conditioning time.
If you choose to ferment under pressure, you should consider how that affects the yeast character.
The yeast is therefore not an accessory attached to the recipe.
It is part of the architecture of the recipe.
Learn a Yeast by Brewing With It More Than Once
One batch rarely tells you everything about a yeast.
If a strain interests you, use it again.
Try it in another recipe.
Try a slightly different fermentation temperature.
Observe how quickly it begins fermentation.
Watch how it behaves during peak activity.
Record how long it takes to reach stable gravity.
Observe how strongly it flocculates.
Taste the beer young.
Taste it again after conditioning.
Over time you begin to recognize the strain.
You learn whether it produces more fruit when warm.
You learn whether it drops clear quickly.
You learn whether it tends to finish slightly higher or lower in your system.
You learn whether you like it under pressure.
You learn which malts and hops work well with it.
This practical experience is one of the most valuable tools a brewer can develop.
Keep Fermentation Notes
A brewing recipe should record more than malt and hops.
For yeast, record at least:
Yeast strain
Lot or production information when useful
Dry or liquid
Amount pitched
Starter information if used
Pitch temperature
Fermentation temperature
Temperature changes
Pressure if used
Original Gravity
Final Gravity
Time to stable FG
Observed flocculation
Flavour notes
After several brews, these notes become your personal yeast database.
This is especially useful when you return to a successful recipe months or years later.
Instead of remembering:
“That yeast worked well.”
you know exactly how you used it.
The Most Important Rule: Measure Gravity
Regardless of which yeast you choose, do not determine the end of fermentation by airlock activity alone.
An airlock can slow because fermentation is almost complete.
It can also slow because of temperature changes, pressure differences or leaks.
Likewise, visible krausen can disappear while fermentation is still continuing.
Use gravity measurements.
For example:
OG: 1.056
Day 5: 1.014
Day 7: 1.011
Day 9: 1.011
The stable reading provides much more useful evidence that fermentation has finished than simply saying:
“The airlock stopped bubbling.”
This is true for American, English, Belgian, wheat, Saison and lager yeast alike.
Yeast does not follow your calendar.
Measure what it actually did.
What Should You Do When the Yeast Does Not Behave as Expected?
Suppose the manufacturer lists attenuation at 78–82%, but your beer stops much higher than expected.
Do not immediately conclude that the yeast is bad.
Check the entire system.
Was the hydrometer reading accurate?
Was a refractometer reading corrected for alcohol?
Was the wort highly fermentable?
What was the mash temperature?
Was enough healthy yeast pitched?
Did fermentation become too cold?
Was the original gravity unusually high?
Did the yeast flocculate prematurely?
Was there adequate nutrition?
Was fermentation placed under pressure very early?
Has gravity actually remained stable?
Fermentation problems are rarely solved by looking at one specification in isolation.
The yeast, wort and fermentation environment form a system.
There Is No Perfect Yeast
The idea of finding one perfect yeast for every beer is attractive.
It does not exist.
A yeast that is perfect for one recipe can be completely inappropriate for another.
The cleanest yeast is not always the best.
The highest-attenuating yeast is not always the best.
The fastest yeast is not always the best.
The most expensive yeast is not always the best.
Liquid yeast is not automatically better than dry yeast.
High flocculation is not automatically better than low flocculation.
The correct yeast is the one whose flavour, attenuation, flocculation, temperature requirements, alcohol tolerance and fermentation behaviour match the beer you intend to make.
Final Thoughts
Across this yeast series, we have seen that brewing yeast is far more than a biological tool for producing alcohol.
Yeast determines how fermentation proceeds and contributes directly to the identity of the finished beer.
We have looked at how brewing yeast works, the differences between ale and lager yeast, attenuation and flocculation, fermentation temperature, pitching rates, dry and liquid yeast, starters and the major families of brewing yeast.
All of those subjects lead to one practical conclusion:
Yeast should be chosen as part of the recipe, not after the recipe has already been designed.
Start with the beer you want to drink.
Think about its malt character.
Think about its hops.
Think about dryness and body.
Think about the fermentation character.
Think about the temperature you can control.
Think about the original gravity and alcohol level.
Think about clarity, conditioning and pressure.
Then choose the yeast strain that connects those pieces.
A good yeast choice does not simply ferment the wort successfully.
It makes the ingredients work together.
And that leads to the most important lesson of this entire series:
Do not ask which yeast is the best. Ask which yeast is right for the beer you want to brew.